
Remote Notification Server using APNS & Node Js
Posted on November 29, 2021 at 07:24 AM

What is a push notification?
Going by the dictionary meaning, “notification is an act or instance of giving information”. It is a very important part of modern day communication devices. A very simple example of a push notification is the ‘sale’ alert user gets on an e-commerce platform. It gives the crux of the sale with a quick read.
Pull notification vs Push notification

As compared to pull notifications, push notifications are power efficient.
In a pull notification, applications go through a start-stop cycle and poll the server for the new notification. Notification could not be received if the application is closed or the device is not running. This type of notification is more popular with email services.
Whereas in push notification, the server sends the notification to the device. Here, the application receives the notification if the device is on, and in case the device is off, the server holds the messages for a set period of time and tries to deliver the messages again until it is expired.
Firebase Cloud Messaging(FCM), Apple Push Notification Service(APNS), and AWS Short Notification Service(SNS) are some examples of the notifications services.
Setting up a Remote Notification Server using Node Js
There are several types of notifications depending on their use cases. In our use case, we are setting up a remote notification server which generates a notification and sends it to the user through APNS.
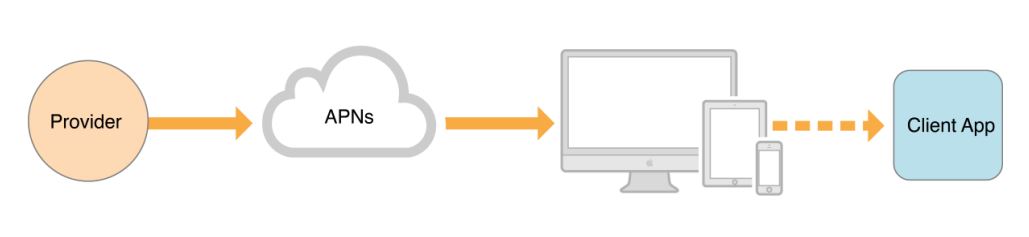
Key components for the delivery of notification are
Provider server
Apple Push Notification Service
User’s device
Our application in the device
Setup for push notification service
It could be divided into 2 parts:
First establish an“accredited, encrypted, and persistent IP connection” between APNS and the application to get a unique application-specific device token from the APNS.
Also, the second half of the setup requires a secure and persistent channel between Provider server and APNS. Let’s get into the requirements for the server side application which will be built in Node Js.
Visit the official site to set up the communication channel between application and APNS.
Requirements for the server side application built in Node Js

For this part of the project, let’s directly jump into the code. All the requirements will be explained along the way.
(I’m using VScode for editing as I’m very comfortable with it.)
Execute the following command to create a server using Express Js
mkdir notification-service
cd notification-service
npm init
npm I express apn
Open the folder in VScode and copy the code written below in the
`index.js`file.
const express = require(“express”),
app = express(),
{ sendNotification } = require(“./notification-helper”);
app.post(“/notification”, function (req, res) {
const { id, title, body, payload } = req.body;
const deviceToken = “<unique device token>”;
sendNotification({
id,
title,
body,
payload,
deviceToken,
})
.then((data) => res.status(200).json({ data }))
.catch((error) => res.status(200).json({ error }));
});
app.listen(3000);
Here we are creating an HTTP server listening on port 3000. Notification sender will create a POST request to the endpoint `/notification` sending id, title, body, and payload.
Device token is hard coded in here. But in reality, through some user data mapping, these device tokens are retrieved from the database.
These device tokens are not fixed. The APNS could issue a new token depending on the variety of reasons:
User installed the app on a new device
User re-installed OS
The user restored the device from a backup
Several other system related events
Create a new file `notification-helper.js` and copy below written code.
const fs = require(“fs”),
path = require(“path”),
apn = require(“apn”);
const APN_PASSPHRASE = “<Passphrase>”,
APN_CERT = fs.readFileSync( path.join(__dirname, “<PATH / TO / APNs certificate pem>”)),
PRIVATE_KEY = fs.readFileSync(path.join(__dirname, “<PATH / TO / APNs private key>”)),
APN_APP_BUNDLE_ID = “<application-bundle-id>”;
const apnProvider = new apn.Provider({
passphrase: APN_PASSPHRASE,
cert: APN_CERT,
key: PRIVATE_KEY,
production: false,
});
const sendNotification = (data) => {
return new Promise((resolve, reject) => {
try {
const { id, title, body, payload, deviceToken } = data;
const note = new apn.Notification();
note.topic = APN_APP_BUNDLE_ID;
note.expiry = 3600;
note.priority = 10;
note.mutableContent = true;
note.collapseId = id;
note.payload = payload;
note.alert = {
title,
body,
};
apnProvider
.send(note, deviceToken)
.then((result) => {
apnProvider.shutdown();
if (result.failed & result.failed.length) {
reject(result.failed);
} else {
resolve(“success”);
}
})
.catch((e) => {
apnProvider.shutdown();
reject(e.message);
});
} catch (e) {
apnProvider.shutdown();
reject(e.message);
}
});
};
module.exports = {
sendNotification,
};
Now the key points here are:
Get the following informations from developer.apple.com:
APN_CERT (certificate)
APN_PRIVATE_KEY (private key)
APN_PASSPHRASE (passphrase)
APN_APP_BUNDLE_ID(app id / bundle id )
Get the following information from apple developers account. Visit the official website for the steps.
Notification configuration key:
topic
It is an app’s bundle ID or app ID.
expiry
APN stores the notification attempts to send the notification span over the period of time before the expiry date
priority
Notification is sent immediately if priority is 10.
If priority is 5, then the notification is sent to the device based on power consumption consideration on user’s device
mutableContent
If set to true, the notification could be modified by notification-service app extensions.
collpaseId
Each notification sent is made to display to the user. collapseId is used to identify and replace all the notifications with one single notification.
payload
It is a json data which has a maximum size limit of 4KB and 5KB over VoIP
alert
It sends the notification which invites user’s interaction.
Related Posts

Taxi Booking Service – A relief For Every Individual
Nowadays, Smartphone services have changed the world completely as if someone has …
Continue reading "Taxi Booking Service – A relief For Every Individual"
On-Demand Apps – Solutions for 2018
With the advancement of the internet and smartphones in today’s economy, everything …
We could talk tech all day. But we’d like to do things too,
like everything we’ve been promising out here.